


Culturing worms to enrich the earth
 E. coli on vegetables? Not if they are grown properly with vermicomposting, says Antonio de Castro, an English Literature teacher-turned-organic farmer and waste-management advocate.
De Castro, who is also the president of Organic Producers Trade Association, says that earthworms have long been misunderstood and underrated when they may be the answer to food security crises such as the deadliest E. coli outbreak in Europe. Likewise, the much-derided worm may be the solution to problems of solid waste management and environmental protection in our backyards.
The earthworm farmer cites a US Environmental Protection Agency report that has proven vermicomposting effective in reducing pathogen levels in organic wastes, including the enterohaemorrhagic E. coli – the bacterium that has killed some 50 people and infected thousands more, mostly in Germany.
From among many different techniques and approaches to raising earthworms and vermicomposting, De Castro has devised a simple and inexpensive technique that has been successfully applied in the Earthworm Sanctuary farms in Palawan; Tanay, Rizal; La Mesa Eco Park in Quezon City; and in the Eco Village farming community in Iba, Zambales. Its success comes from mimicking how nature has done it for millions of years. Here is how:
By Antonio de Castro
The Chinese character for earthworms translates as “angels of the earth.”
Angels of the earth indeed. One of Earth’s oldest living organisms, these lowly but highly organized creatures have contributed much to restoring the earth’s ecological balance.
They cultivate and aerate the soil prodigiously. They enrich it with their castings, increase porosity for water absorption and retention, and create a mini ecology for a wide range of microbial life necessary for healthy plant growth, all the while consuming decomposing “waste” materials.
The earthworms we use are African nightcrawlers (Eudrilus eugeniae), named so for having originated from West Africa.
African nightcrawlers are voracious, eating one to two times their weight every day. How much the earthworms eat depends on how hungry they are or on what kind of food (biodegradable wastes) you are feeding them.
They are also incredibly prolific. An adult breeding earthworm produces four cocoons per week. With an 81-percent hatching rate they produce three hatchlings per cocoon. This results in seven baby earthworms every week per adult worm. These babies reach sexual maturity in one to three months then they start producing seven babies per week. That’s almost an exponential increase.
Earthworms are hermaphroditic. That means that each worm possesses both male and female organs. Conceivably, when they mate, both can become fertilized. So it’s not only ½ (that’s the female) that produces seven babies a week but all of the adult population.
Earthworms feed on organisms – such as bacteria and fungi – that are decomposing organic materials. As the population of microbes increase rapidly, decomposition happens faster and produces heat. When the compost pile starts to cool down, this is the time to introduce the earthworms into the compost.
Perfect fertilizer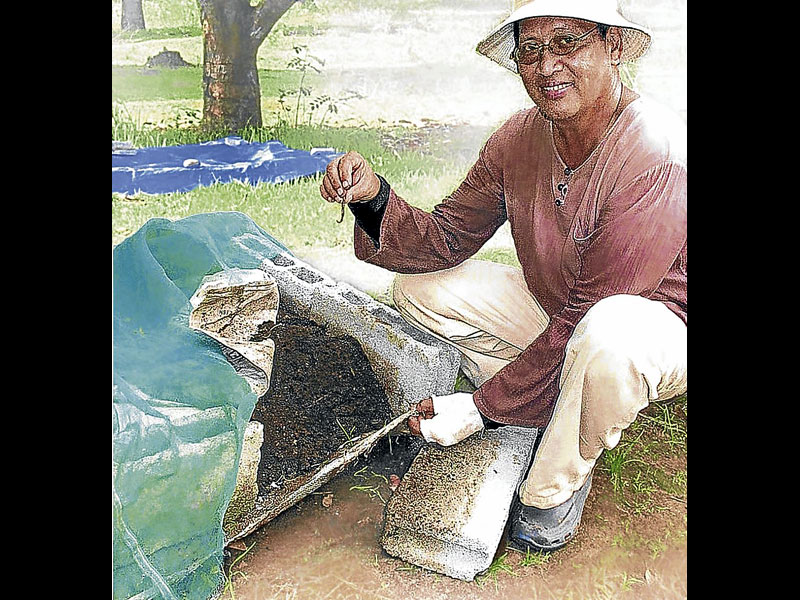 Vermicomposting is the biological decomposition of biodegradable wastes via the joint action of earthworms and microorganisms with the help of some other creatures as well.
Earthworm castings enrich the soil. They make the soil alive and brimming with large numbers and wide varieties of micro and macro organisms.
Compared with soil, vermicastings contain 5 times more nitrogen, 7 times more phosphorus, 11 times more potassium, 3 times more exchangeable magnesium, and 1 ½ times more calcium. One explanation for this dramatic increase is that earthworms liberate nutrients from particles of both organic and mineral matter that would otherwise remain unavailable to plants.
To get good soil nutrients, use leguminous plants as compost materials to increase nitrogen such as kakawati, ipil-ipil, acacia, malunggay, peanuts and mungo. You can get potassium from banana trunks, leaves and peels, and papaya. Animal manure is a good source of nitrogen and phosphorous.
At the Ecoville Organic Farm of ABS-CBN Foundation in Iba, Zambales, we have concocted a blend of vermicompost, biochar (carbonized rice hull) and lahar that we use to fertilize the high-value crops grown there organically, including heirloom tomatoes, lettuce, cilantro, arugula and basil.
The vermicompost provides some nutrients, but most importantly, a large number and wide diversity of microbes. The microbes then multiply into the pores and cavities of the biochar, effectively doubling or tripling the beneficial microbes. The microbes then help dissolve the lahar to release the minerals.
The activity of the beneficial microorganisms in the soil and the dissolved minerals provides the complete nutrients needed for good plant growth and fruit production in a naturally controlled release process according to the plants’ needs.
Additionally, the biochar is an effective way to capture or sequester carbon that can help in addressing the problem of global warming. So, our battle cry is “Stop Global Warming – Support Global Worming!”
Culturing Earthworms
1. Prepare the materials you need:
16 hollow blocks, Sheet of plastic or old plastic sacks about 3 meters by 1 meter.
Fishing net with ¼ inch holes. About 3.5 meters by 1.5 meter.
2. Find a suitable location.
It should be a flat surface with good drainage. If you don’t have a shaded area, put up a shade. It should not be close to noisy or vibrating machinery.
3. Lay the plastic sheet flat.
4. Arrange the hollow blocks on top of the plastic sheets in a rectangle, 3 blocks by 5 blocks. You don’t need to cement the blocks together but if you do, make sure there is good drainage.
5. If you have composted materials ready, fill the bed with it until overflowing. Make sure the compost you are using is past the heat or thermophilic stage, and has the appearance of dark humus but with still large particles. It is good to include small branches and twigs to improve aeration. These can easily be removed later.
If you don’t have composted materials, you can put biodegradable materials in the bed and compost them there for two to three weeks.
Keep the pile moist and dark. You can place a loosely fitting tarpaulin over the heap. Don’t put the earthworms until the organic materials have passed their heat or thermo- philic stage, and are already taking on a dark brown color, and starting to fall apart.
If you are using organic materials that attract flies and exude a rotting smell, cover the compost with a layer of dried leaves, grass, sawdust or rice straw.
With your bed full of well-composted materials, drench it with water. Make sure there is good drainage and there are no areas where water will accumulate.
6. You can now introduce the earthworms into the bed. The earthworms, which can be obtained from a vermiculturist, should come already packaged with well-composted materials in transit and limited storage. Place the earthworms (you can start with around 1 kilo) along with the organic materials they came within one corner of the bed. Do not scatter them throughout the bed. Keep them in one space together with the material they came with.
Important: the earthworms will spread on their own if the materials in the bed are in a form acceptable to them. If it is not, at least the earthworms can stay where they are until the bed reaches its proper stage.
7. Cover the bed with the fishnet and weigh it down so it can’t be blown away and the worms eaten by chicken, frogs, lizards or other predators.
8. Water the bed as needed. The best water to use is spring, rain, river or groundwater. If you use faucet water, let it sit in an open container for one day to evaporate the chlorine.
9. Check the bed periodically to make sure it is moist (about two to three times a week). Never let it dry out.
10. In one week, you should start seeing formations of vermicast along the top edges of the bed. That is a sign that the earthworms are alive, eating and producing vermicast.
11. Do not disturb the worms too much. They are fragile and sensitive. Handling, noise and other disturbances affect their feeding and reproduction.
12. In about two to three months, the bed will be mostly vermicompost and ready for harvest. Do not wait until all the materials have been consumed and only vermicompost is present. Remember that this is their waste and no one wants to live in their waste.
13. Prepare a second bed while all this is happening. This is to prepare the composted materials to which you will transfer the earthworms after you have separated them from the vermicompost in your first bed.
(You can obtain your earthworm starter kit from Antonio de Castro who can be reached at 0922-8961996 or at earthwormsanctuary
@yahoo.com. For more information visit www.earthwormsanctuary.multiply.com.)


